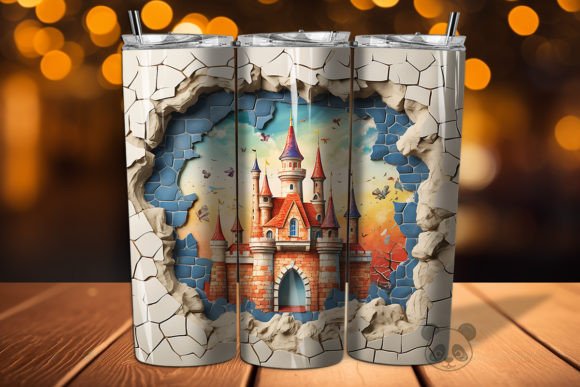
Mastering the 3D Castle Cracked Hole Tumbler 3 Design for Professional Sublimation Results
The allure of creating custom drinkware lies in the ability to transform a plain object into a piece of art that tells a story. The 3D Castle Cracked Hole Tumbler 3 design captures this imagination perfectly, offering a whimsical yet dramatic aesthetic that blends fairytale architecture with modern 3D visual effects. For sublimation enthusiasts and small business owners, this specific digital asset represents more than just an image; it is a tool for crafting high-value products. However, jumping straight into printing without understanding the nuances of 3D seamless patterns and tumbler wraps can lead to wasted materials and disappointing results. This guide walks you through the essential considerations to ensure your final product matches the quality of the digital file.
Understanding the Digital Asset Before You Print
When you purchase an instant digital download like the 3D Castle Cracked Hole Tumbler 3 Background, you are acquiring a specific set of parameters designed for a 20 oz skinny tumbler. The file typically arrives as a high-resolution PNG, often around 9.3 inches by 8.2 inches at 300 DPI. While these specifications sound straightforward, a common misunderstanding among beginners is assuming that "instant download" means "instant perfection." The reality is that the digital file is only half the equation; the other half is your preparation and application process.
Many creators overlook the importance of the file format and resolution context. A 300 DPI image is standard for print, but if your design software resizes the canvas incorrectly upon import, you risk pixelation or blurring. The Castle watercolor elements and the 3D design features rely on sharp edges and clear gradients to maintain their depth. If the resolution drops during your workflow, the "cracked hole" effect may look like a smudge rather than a dimensional breach in the castle wall. Always verify the image size in your editing software before placing it onto your tumbler template.
Avoiding Alignment Errors with Seamless Patterns
One of the most frequent pitfalls when working with a Castle 3D seamless pattern or any wrap design is misalignment. The 3D Castle Cracked Hole Tumbler 3 is engineered to wrap around a cylindrical surface, meaning the left and right edges must meet perfectly to create a continuous scene. If you fail to account for the overlap or the printer's margin settings, you might end up with a visible seam that cuts through the castle tower or disrupts the sky background.
To avoid this, you must understand the geometry of your specific tumbler. Not all 20 oz skinny tumblers are identical; slight variations in diameter can affect how the wrap fits. A practical approach is to measure the circumference of your blank tumbler and compare it to the width of your printed design. If the design is a seamless pattern, you have some flexibility to shift the image horizontally to find the best hiding spot for the seam, perhaps behind a tree or within the shadow of the castle. However, if the design has a focal point, like the cracked hole itself, you need to center that feature carefully so it doesn't get lost in the overlap zone.
The Trap of Ignoring Color Profiles
Color management is another area where even experienced marketers and freelancers can stumble. The vibrant colors you see on your monitor often differ from what comes out of the sublimation printer. The Castle png file likely uses the RGB color space, which is ideal for screens but not for printing. Sublimation printers generally work best with CMYK profiles, although many drivers handle the conversion automatically. Relying solely on automatic conversion can sometimes result in muted blues in the sky or dull grays in the stone walls.
A better approach is to perform a test print on regular paper first. Hold this test print against the white tumbler to gauge the color intensity. If the Castle background looks too dark, you may need to adjust the brightness and contrast in your editing software. Remember, sublimation ink transfers differently onto coated metal than it does onto paper. The heat press process can slightly darken the image, so aiming for a slightly brighter digital version often yields a more accurate final result.
Preparation and Application Best Practices
Once you have verified your file and adjusted your colors, the physical application becomes the priority. A critical mistake here is neglecting the cleanliness of the tumbler surface. Any dust, oil, or lint trapped under the Castle tumbler wrap will create permanent bumps or white spots in the final image. Before applying your sublimation transfer, wipe the tumbler down with lint-free cloth and high-percentage alcohol. This step is non-negotiable for professional-quality goods.
Furthermore, when dealing with a 3D tumbler wrap that features complex details like cracks and watercolor textures, tension is key. If the transfer paper is too loose, the image can shift during the pressing phase, causing ghosting or blurring. Conversely, if it is too tight, the paper might tear or wrinkle, distorting the 3D Castle architecture. Use high-temperature heat tape to secure the paper firmly, ensuring there are no air bubbles. Pay special attention to the edges of the design; if the Castle wrap extends close to the rim or base, ensure the paper is tucked or taped securely to prevent curling.
Setting the Right Time and Temperature
Every sublimation blank and printer combination requires a unique "sweet spot" for time and temperature. While general guidelines suggest 380°F for about 50 to 60 seconds for skinny tumblers, relying blindly on these numbers can be risky. The 3D Castle Cracked Hole Tumbler 3 design contains fine lines and gradient shifts that are sensitive to under- or over-pressing. Under-pressing leads to faded colors and poor ink penetration, while over-pressing can scorch the coating or cause the colors to bleed, ruining the crispness of the castle outline.
It is highly advisable to keep a log of your press settings. If your first attempt with the Castle seamless pattern looks washed out, increase the time by five-second increments rather than drastically changing the temperature. Small adjustments allow you to dial in the perfect setting for your specific equipment. This methodical approach saves money on ruined blanks and ensures consistency if you plan to sell these items in bulk.
Evaluating Your Final Product
After the press cycle is complete and the tumbler has cooled, the evaluation phase begins. Remove the paper carefully and inspect the Castle skinny tumbler for any defects. Look closely at the "cracked hole" area; this is where the 3D illusion should be strongest. If the edges of the crack appear fuzzy, it may indicate movement during pressing or a resolution issue with the source file. Check the seamless transition of the background; the sky and ground should flow naturally without a hard line interrupting the view.
For entrepreneurs and small business owners, this quality check is vital for maintaining customer satisfaction. A flawed product can damage your reputation faster than a slow shipping time. If the result isn't perfect, analyze the variable that caused the issue. Was it the file sizing? The heat press pressure? The cleanliness of the blank? By treating each production run as a learning opportunity, you refine your process and elevate the quality of your 3D design offerings.
Ultimately, the 3D Castle Cracked Hole Tumbler 3 is a fantastic resource for creating eye-catching drinkware, but its potential is only realized through careful preparation and execution. By respecting the digital file's specifications, managing your color profiles, and mastering your heat press technique, you can produce stunning tumblers that stand out in a crowded market. Whether you are a hobbyist making gifts or a professional building a brand, attention to these details separates the amateur from the expert.